Attic Insulation: The Ultimate Guide to Replacing Your Insulation
Are you considering installing insulation in your unheated attic? Doing it yourself can be an easy task but if you aren’t an expert you can as well prepare for the challenges that await ahead. When winter is around the corner, you want to ensure that your attic insulation is up to the task. Here is the ultimate guide to replacing your insulation.
How Important is Insulation for Your House?
If you live in areas that are prone to extremely cold temperatures, then you may already be aware of the expenses that come with maintaining warmth in your house during winter. According to the energy department in the US, heating oil and natural gas prices continue to rise in winter following increased demand, something that happens almost every winter season.
Of course, there are various ways of keeping yourself warm and reducing your energy expenses in winter such as wearing heavy and warm clothing and reducing your thermostat. One thing however that’ll still contribute to high energy bills is an unfinished or inappropriately insulated attic.
An appropriately insulated attic can help you cut down up to 50% off your energy costs according to the energy department in the US. The good thing about having good quality insulation in your home is the fact that it remains functional even during the summer season. The only difference then is that it’ll help lower down the temperatures indoors to create a comfortable environment for you to live in.
If you still have doubts about the number of energy utilities you’re handling, you may want to call in an expert to analyze how efficient your attic insulation is. The experts play a major role as well when it comes to inspecting your attic insulation for any leaks, gaps, or even cracks. If there are any cracks, then your expert will recommend the best sealing method in a bid to enhance the functionality of your insulation.
Perhaps you’re not in a position to hire a professional to inspect your insulation. If you aren’t, then the attic insulation guide will help you understand everything about your insulation from the products, the preparation, all the way to the installation.
What’s the Ultimate Attic Insulation Type?
Perhaps you’re scratching your head trying to find out; what’s the ultimate insulation? Well, the answer to this question highly depends on your needs. One thing you should remember though is that the ultimate insulation method is not always the most practical in terms of cost. There are various commonly used insulation types which are; cellulose, spray foam, fiberglass batts, and loose-fill fiberglass. These are just but a fraction of the available options.
Fiberglass Batts
Fiberglass batts are currently the easiest method of adding insulation to various places in your home. But, studies have rated this insulation method among the worst the market has ever seen. The good side of this insulation type is that you can just pick it up from your store and use it when the need arises.
Cellulose
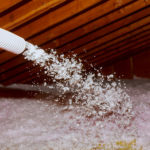
Cellulose is made using ground recycled paper. Boric acid is also added to the cellulose to keep insects at bay, and to make it fire-resistant. If you decide to install it on your own, all you need to do is purchase the insulation from a home improvement store within your locality. It’s available in bags.
Depending on the amount of insulation you purchase, the store could give you the blowing machine free of charge. Whatever you do, avoid purchasing only one bag thinking that you can spread it using your hands because it won’t work. You should know that this insulation is densely packed which is why you need a blower to facilitate the application process.
What’s more, the insulation process can be too dusty and messy which is why you need the machine to get it over and done with and fast as possible. If you aren’t experienced enough to install the insulation, then you’ll have to hire a professional. Many professionals choose to add some water to the insulation for dust control. Water also enhances the value of the insulation per inch.
The R-value of cellulose insulation is about 3.5 for every inch. Still, it can easily regulate air movement. The problem with cellulose is that it hardly creates an air barrier but it offers enough density to prevent a high percentage of air movement and this comes in handy to control frost in your attic.
Loose-fill fiberglass
Many homes today use loose-fill fiberglass for their new homes. It comes with a 2.5 inch R-value. Just like in the case of cellulose, you’ll need a big machine to facilitate the installation process. Unlike the cellulose insulation, you may not be able to install the loose-fill fiberglass insulation on your own. This is because it can cause allergic reactions such as itchiness and irritation in the lungs.
For this reason, you need to call in a professional to execute the installation process since they’re well experienced and understand all the precautionary steps they should adopt before embarking on the installation process. One thing that raises concern about this insulation type is the fact that; studies suggest that loose-fill fiberglass can lose its insulation value when temperatures drop by 20 degrees. Of course, this reduces its effectiveness and makes it more inferior compared to the other insulation types.
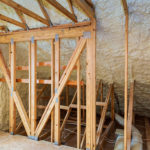
Spray foam
If you’re looking for the best insulation type for your home, then you can as well settle with spray foam insulation. You can choose from the available two types of insulation which are; open cell and closed cell insulation. They come with an R-value of approximately 3.6 and 6.5 respectively.
Once it’s installed appropriately, the insulation types fill up all the crannies and nooks in your crawl space or even attic, creating the ideal air seal. When you keep air movement out of the bay, then it means that heat can’t be transferred via convection. If you choose closed-cell foam insulation, you may be lucky enough to get a 2-inch thick moisture seal. Due to the high effectiveness of closed-cell spray foam insulation, it’s used in various areas that experience extreme temperatures.
How can you tell the difference between these two insulation types? All you need to do is simply poke each using your finger. In the case of open-cell, you’ll easily create a hole but doing so will be difficult in the case of closed-cell insulation foam.
The only set back with spray foam insulation is the fact that it’s way too costly. What’s more, you can’t just wake up one morning and install it on your own unless you’re a qualified and experienced insulation professional. The good part is that you can easily hire a professional to appropriately install it for you. Check out how to take care of your attic below.
Don’t use Your Attic as a Storage Area
If you are looking to insulate your attic area, then one of the cheapest and easy ways to do so is by adding the insulating material on the floor. Assuming your floor is all covered with plywood, you’ll have no space remaining to install your insulation for effective performance. If you’ve been using the attic as a storage area, you’ll need to dismantle all the plywood layers to make way for the insulation.
Pick Your Insulation Material and Type
If you thrive in doing stuff by yourself, then you’ll want to choose your insulation type and material of choice. In this case, you’ll have two options; the batt or loose-fill insulations. The advantage of these two types is that you can easily use it on top of the existing material. Once you have chosen your ideal material, analyze the available options, and compare prices so as to choose the right product for your needs.
Always check labels to ensure that everything you’re looking for has been included. As mentioned above, loose-fill fibers are packed in bags and all you need after purchasing them is to blow them in place depending on your preferred density and depth with the help of special machines which you can rent from your local home improvement center.
The good thing about this insulation is that your provider may just give you the applicator machine free of charge if they’re convinced that you’ve purchased huge amounts of the insulation. Remember, you can even spread the insulation manually; the only problem is that the process is labor-intensive and you won’t achieve the best of results.
The loose-fill insulation is ideal for:
- Attics that have nonstandard or irregular joist spacing
- Attics that already have existing insulation but you want to reinforce it or fill in cracks, holes, joints, and gaps.
- Attics with numerous penetrations or obstructions to eliminate
- If you’re a DIY enthusiast who wants the work done and completed fast and cheaply, then you can as well install it without calling in a professional.
Materials You’ll Need
Fiberglass
Fiberglass with an R-value of between 2.2 and 2.7 made from sand or recycled glass, that’s melted and swirled up to form fibers. This material is lighter than mineral wool or even cellulose. However, it offers a better settlement compared to the aforementioned materials. What this means is that you’ll want to apply a thick layer to achieve the protection you’re looking for.
Cellulose
Cellulose with a 3.2 to 3.8 R-value per inch made using fibers obtained from recycled and treated post-consumer paper. The treatment process is necessary for enhanced fire and insect resistance. Cellulose is one of the most common blown-in materials you can use. One downside of cellulose is; when exposed to moisture mold will grow and in extreme cases, it might even rot.
Mineral wool
Mineral wool with a 3.0 to 3.3 R-value, made from fibers obtained from recycled slag from blast furnaces or rock. Mineral wool provides a natural fire resistance but is quite costly compared to other loose-fill materials.
Batts
Batt is a flexible insulation material that’s usually packed in rolls that are available in varying standard widths and thicknesses, between 16 and 24 inches to fit between the studs and joists in the house framing. You can purchase them with or without a foil facing which plays the role of a vapor barrier. All you need to do is add one or even more layers to accomplish your preferred insulation level.
This insulation type is ideal for:
- Attics with no existing insulation
- Attics with minimal penetrations or obstructions
- Attics with a standard joist spacing
- Attics with enough headroom to facilitate movement during installation
- Do it yourself fanatics who are happy getting dirty from dividing the material to ensure it fits around the obstructions.
Determining the Size of Your Existing Insulation
When it comes to establishing the size of your existing insulation, all you need is a flashlight and a tape measure. The former will help you inspect the condition and depth of your attic insulation. The next step will involve establishing the R-value of the insulation before finally pulling it up and disposing of any compressed, moldy, or water-stained material.
If your house was built anywhere in the 1990s and has attic insulation, the best thing to do would be to have it replaced. This kind of job would require a qualified professional for the safe removal of the old insulation and safe installation of a new one.
Check for Credits and Rebates in Your Region
A big percentage of federal tax gives credits for insulating homes and promoting their energy efficiency stopped existing in 2011. However, the energy office within your locality could offer product discounts, rebates, or other financial incentives for insulating your home.
How Much do You Need?
To establish this, you need to establish the square footage of your attic. If you’re using loose-fill, ensure to read the labels. Every bag contains a varying R-value range and the number of bags you need to insulate 1,000 square feet using those depths.
If you’re using rolls and batts, you’ll want to calculate the number according to the length and width of the product you’re using. Whether you choose rolls or even batts, you may want to purchase an extra roll or bag just to be on the safe side. You don’t want the product running out before you complete the process.
Sealing Your Air Leaks
If your attic or lower floors have cracks or gaps, then heat or cool air will penetrate through the unconditioned outdoors and this will reduce the efficiency of any insulation type you choose. Here are tips to help you fix the gaps or cracks.
If the cracks are around the flues and chimneys, use furnace cement or metal flashing covered with high-temperature caulk.
If the cracks are around your attic windows, use less-expanding, canned spray foam across the casing and foam weatherstripping to close the leaks around the jambs and sash.
If the gaps are around the exhaust fan if they’re larger than that, you may want to use fire blocking spray foam.
Things to Do Before Insulating
Adhere to the following tips if you want your insulation to last for many years to come, and enhance the energy efficiency of your home.
Mend Roof Leaks
Water is the number one enemy of your insulation. It not only makes your insulation a breeding ground for contaminants, but it also destroys the air confining pockets which block heat flow. If you want to know whether or not there are leaks in your insulation, look for any signs of water stains in the roof sheathing. Other things you can look out for include; mold spots or dampness. Remember, mold comes in different colors, and sometimes, you may not even notice it. This is where a professional comes in handy.
Protect Light Fixtures
Cover your light fixtures unless in cases where they are rated safe to encounter any insulation type or when using mineral wool insulation. If you’re using any other insulation type, then protect them from the insulation because it can be a fire hazard. Create a safety gap with metal flashing, hardware cloth, or scrap plywood.
Ensure Vents and Exhaust Fans are Directed Outside
The building code doesn’t recommend venting the exhaust in an attic space. However, many home builders and owners have managed to do so. The best thing you can do is to ensure your vents and exhaust fans are outside the building. This way, you ensure that humid air isn’t confined in the insulation and eventually destroying it.
Wear Protective Clothing During the Installation
You want to avoid injuries and discomfort as much as possible during the installation. Here is how to do it.
Wear goggles, a dust mask, work gloves, long pants, and a long-sleeved shirt. You can opt for an overall instead.
Stay away from joists. Standing on joists can be dangerous because you can easily slip and crash through the ceiling. Get a firm and wide board or sturdy plywood and use it as a standing surface instead. Ensure they stretch over approximately three joists for added stability.
Light up any dark corners of your attic either with clip-on workshop lights or battery-operated portable lanterns.
Safeguard the Airflow in Your Attic
Avoid insulating your soffit vents using batts or even loose fills. Remember, the airflow emanating from the soffits all the way to the ridge vent cools down the roof and averts ice dams. Insulating them, therefore, isn’t recommended because it ends up blocking the airflow.
It’s for this same reason that you should ensure that insulation doesn’t reach the underside of the roof. What you can do, however, is staple foam baffles or plastic on the roof sheathing just next to the eaves to keep the material at bay.
Finally
There are various tips that can help you achieve success in your attic insulation process. They include; during the insulation process, always work from the attic’s perimeter going towards the hatch or door. This way, you won’t step on and destroy your freshly installed insulation. Keep the top side of your ceiling well covered to help you achieve sufficient insulation depth in order to achieve your targeted R-value. This will also avert thermal bridging. Once you’re done with the insulation process, you want to take a thorough shower to eliminate any fibers from your skin. For professional help to replace your attic insulation, contact an insulation expert.